This video and article is intended to be a user guide for the freETarget PC client software. On how to actually build the freETarget housing, there is already an article on this site (see it here). This will focus on how to operate the PC software and what its features are.
The requirements for running this software are minimal. You need a PC to run at least Windows 7. 2 Gigabytes of RAM and 50 megabytes of disk space should be enough. It does run on very old (10+ years) laptops. Also, the software can be run on MacOS using Parallels. It cannot be run on Linux.
Another requirement for the PC software is .NET Framework 4.7.2 or higher. It is usually already installed on up-to-date systems, but if you do not have it, be aware that it has a 4.5 Gigabytes hardware requirement. The installer will prompt you to install the .NET framework if it does not detect it.
First step is installation. The installation kit can be downloaded from the official website of the project: www.free-e-target.com, on the download page. Go to the menu, hover over the Tech Support text and the Downloads submenu will appear. Click on it. Then, in the PC Software section, find the latest download link. At the time of this article, the version is 3.3.0. I consider the software to be feature complete, and no future updates are planned at this time. But..never say never.
After clicking the download link, you will be prompted to save a zip file to your local hard drive. After the download is completed, unzip the archive to a temporary directory and run setup.exe
The installer is very basic. You only need to indicate the installation directory. At the last step of the procedure, a short text will be displayed, indicating the step you have to do manually after the installation is completed. This instructs you to go to the installation directory you have selected at the first step, open the drivers sub directory and execute dpinst-amd64.exe if you are running a 64bit Windows (99% of the cases) or dpinst-x86.exe if you are running a 32bit Windows.
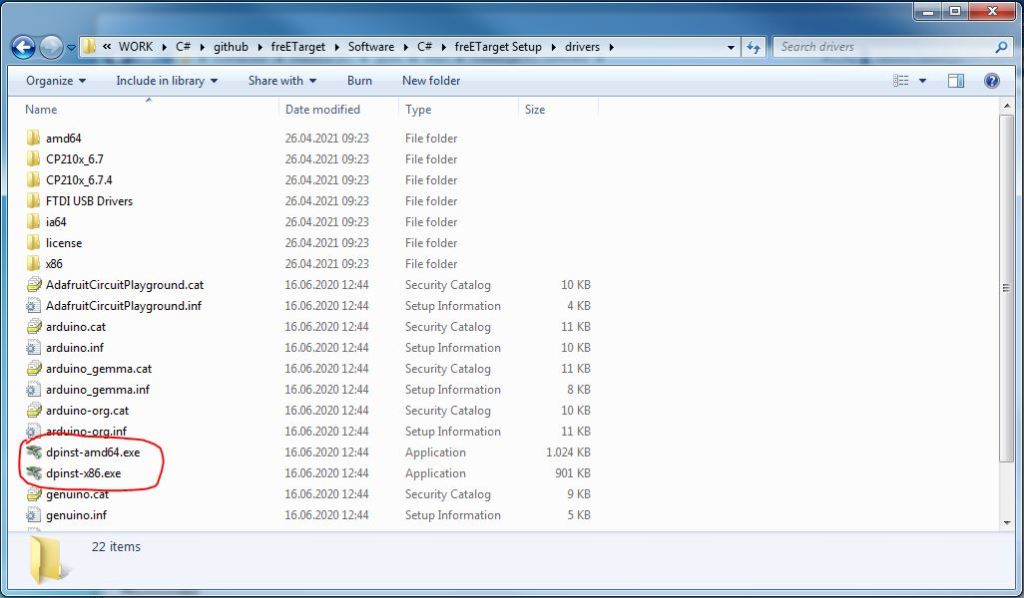
This is the Arduino driver needed for communication with the target.
Last step of the installation is to connect the target via USB and check the connection. After plugging in the USB cable, Windows should recognize the Arduino.
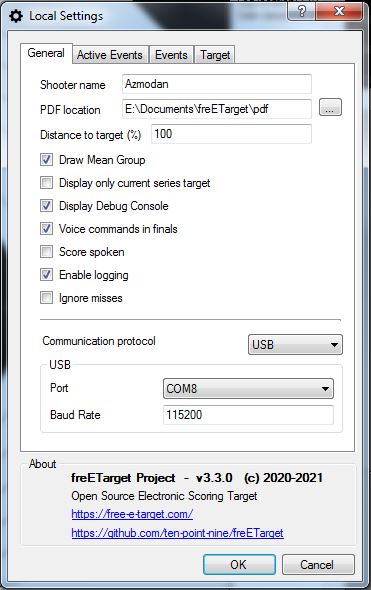
After launching the software by double-clicking the shortcut on the desktop, the first thing you need to do is go to the Settings window. This is done by clicking the gear button in the top right corner. The Local Settings windows will appear.

Short parenthesis – it is called “local settings” because the parameters in this window are saved locally on the PC. In a SQLite database file located in the My Documents system folder, in the freETarget subfolder. You can see the location displayed in the console. In the same location, there are 4 subfolders: database – where the local database is stored, log – where the log files are saved, pdf – where the reports are generated and sessionExport – where the session export files are saved. More on each later.
Back to the “Local Settings” window. There are 4 tabs: General, Active Events, Events and Target. And on the bottom part, the version information of the software.
On the bottom of the General tab, is the Communication section. Here the USB protocol is selected by default, but the TCP over Wi-Fi is also possible. At first opening the Local Settings window, the software will try to identify the Arduino and it will select the COM port where it is detected. After you close the window, the selection will be saved and remembered for the next times the window will be open. The Baud Rate is set at 115200. Please do not change it unless you know what you are doing.
The other parameters on the General tab are:
- Shooter’s name: this is the name of the current shooter. The software supports multiple shooters, but the shooters need to remember to change their name here before starting a session.
- PDF location: the location where the session reports are saved automatically. By default, it is in the My Documents\freETarget\pdf directory, but it can be changed.
- Distance to target: the default is 100% – meaning the default distance for each event. For example, for “10m air pistol”, 100% means 10 meters. If the target is at 8 meters, you can enter 80% here to simulate the actual distance. It is up to you to provide a scaled down printed target in the actual target holder.
- Draw Mean group: a flag if the software should draw a red circle on the screen with the size and the position of the shots group or MPI (Median Point of Impact)
- Display only current target series: display only the shots on the current series – 10 shots for a normal match, 5 or 2 for a final. If the flag is not set, all the shots in the current session are displayed.
- Display debug console: makes visible or not a text area between the target and the timer, where text information is displayed.
- Voice commands in finals: synthetized voice commands for finals, like LOAD, START and STOP.
- Score spoken: after each shot, the score is spoken out loud.
- Enable logging: flag if the software saves all incoming messages from the target plus other information in a text log file. A file is created for each calendar day in the My Documents\freETarget\log directory. This is very useful if you encounter problems and need help or support from someone else. I suggest leaving this option always enabled.
- Ignore misses: the target has an optional “face” sensor for detecting hits on the target housing. If that sensor detects a hit, it will mark the shot as a miss. If this flag is enabled, such a shot will be ignored / not displayed. If it is not enabled, such a shot will be scored as a 0.
Note that you can always find out what an element of a window does by clicking the question mark on the top right corner of the window and then clicking on the active element you want to find out more about.
The next tab of the Local Settings window that we will talk about is Events. This tab allows the configuration of events in the PC software. An event is a template for a shooting session.

Each event has:
- Name: this is a user defined name and it will be used to identify the event on screen and in the database.
- Type: the type of the event. It can be: practice/sighters, match or final.
- Decimal scoring: if the score has to be displayed and saved with decimals
- Number of shots: it can be fixed or unlimited.
- Target: what target is used for this event. The software supports all official ISSF round targets. So no running target.
- Caliber: the caliber of the projectile used in this event, in millimetres. So for .22LR, enter 5.6
- Duration: the duration of the event in minutes. Or -1 for infinite time.
- Color: is the color for the event to be displayed in the main window event selection tool.
- Final | Shots per serie: number of shots in a final serie
- Final | Serie duration: duration of a serie in a final
- Final | Shots in all series: number of total shots in the initial series of a final
- Final | Single shot duration: number of seconds per single shot
- Final | Shot in single series: how many single shots are in a single shot serie
Be careful when editing and modifying an event. The save here is instant, not when the window is closed.
The software will initialize the database with 6 events:
- Air Pistol Practice: unlimited time, unlimited shots, Air Pistol target, caliber 4.5mm
- Air Pistol Match: 75 minutes, 60 shots
- Air Pistol Final: unlimited time (finals have a special timer), 24 shots, 5 shots per final serie, 250 seconds per final serie, 10 shots for final series, 50 seconds for single shots, 2 shots per final single shot series
- Air Rifle Practice, Air Rifle Match, Air Rifle Final: the same number of shots and minutes as for air pistol but with the air rifle target.
You can configure events for other ISSF disciplines. This is, of course, in relation to what actual target housing you built.
The next tab is Active Events. In this tab you can select from all the defined events, only the ones that should appear in the main window event selection tool. If your target housing is built for air rifle, it is useless to display air pistol or free pistol events.

The last tab is Target. Here you can configure the default event. Usually this is a practice type event that is started automatically when the software connects to the target.
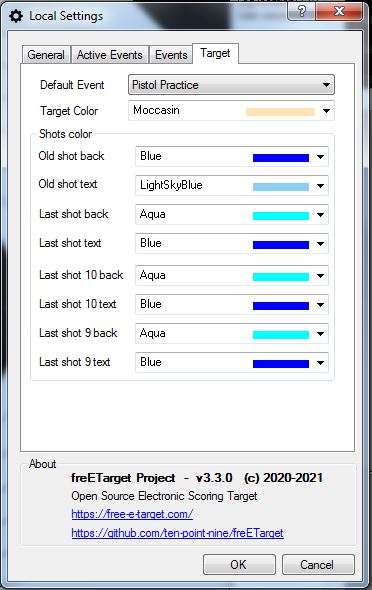
The rest of the parameters on this tab configure the colors of the drawn elements of the displayed target, such as the background color (maybe you prefer white) and the current shot and last shot colors. There is the possibility to assign different colors to shots depending on their score.
This concludes the Local Settings window. By pressing OK you save all the changes done to the parameters in this window, by pressing Cancel, you discard the changes.
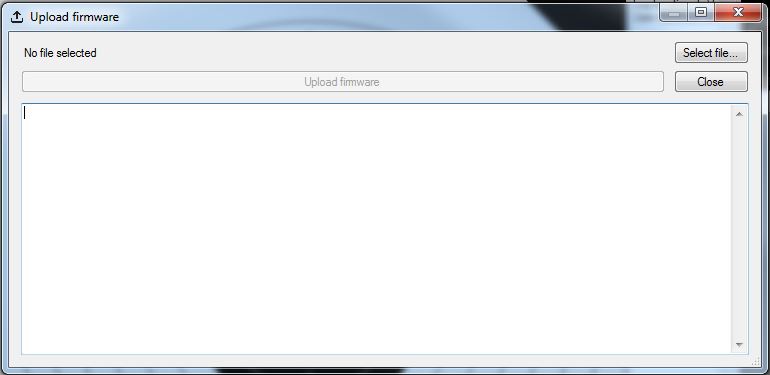
On the main window, the other button active when the target is not connected, is the Firmware upload button. Using this tool, you can upload a new version of firmware to the target Arduino. New versions of the firmware can be downloaded from the same Download page of the website.
To connect to the target, press the Connect button. If the connection is successful, the target will switch from black-and-white to color, and will display in the bottom status bar the target version string plus the communication protocol and port or address.
From this moment, the software automatically starts a new session for the default event, and is able to receive shots from the target.
You can switch between events from the vertical colored tab of the right of the screen. Each tab represents an event, and by selecting a different one, a new session for that event is started automatically. This also automatically saves the current session if there was at least one shot registered.
The elements of the main window are:
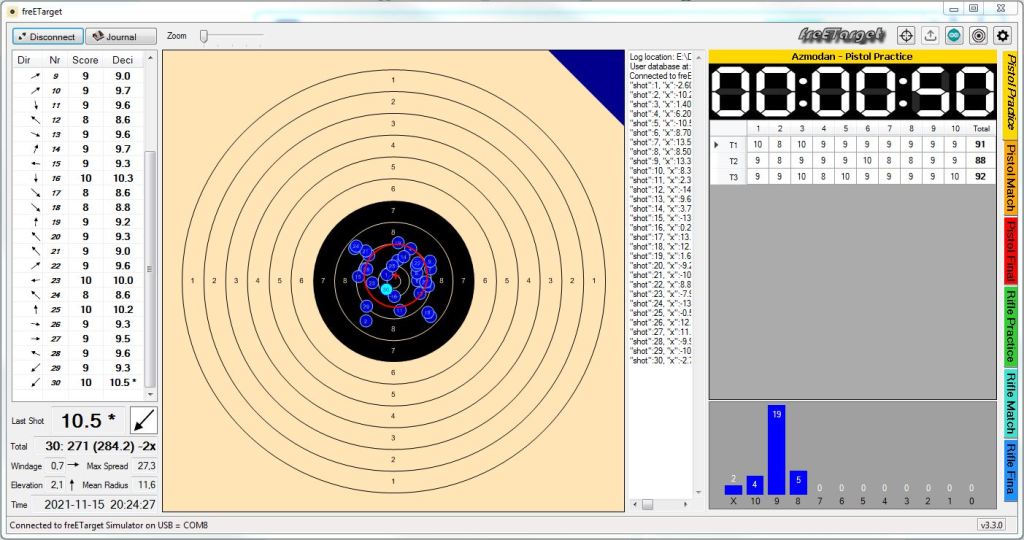
- The shots list on the left: displays the direction for each shot in the form of an arrow, the number of the shot, the integer score and the decimal score of the shot
- On the bottom left is:
- the last shot score in decimal,
- the direction arrow indicating where the last shot has landed in relation to the center,
- The total number of shots in the current session and the total score
- Windage, Elevation, max spread (group size) and mean radius of the shots group
- Current date and time
- The main target display: showing all the shots, with a zoom control on top. The zoom can also be controlled via the mouse scroll wheel.
- The console, with a slider zone so it can be resized
- And on the right:
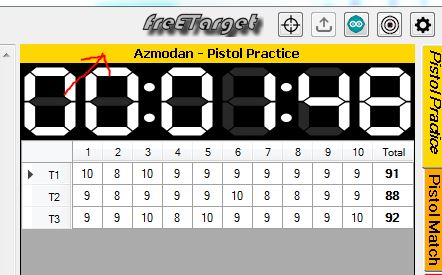
- The timer for the current session. For finals, the timer also displays the commands
- The shots grid: all the shots in the session arrayed in a grid by series
- And at the bottom, the shots distribution graph, displaying the integer scores on a bar chart.
On the shots grid, you can click on each individual series to display it on the main target. If you have selected to show all the shots in the session, clicking on the session name (the colored bar on top of the timer) will deselect the displayed serie.
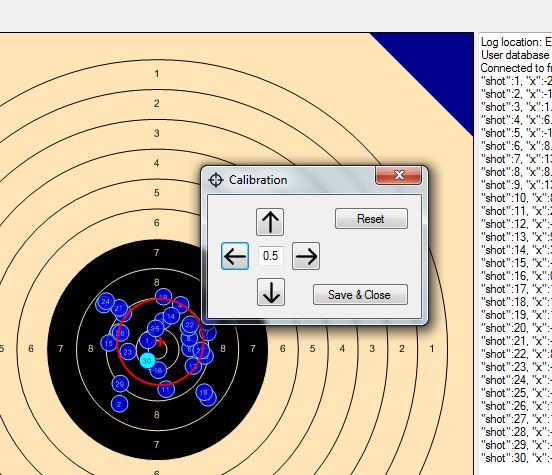
When connected to the target, the Upload firmware button is disabled, but 3 other buttons are enabled. The first one is Calibration. It opens a window where you can shift the shots on the target if the target housing is not built perfectly and you need some adjustments. Just be aware that this kind of shifting does not resolve all the accuracy/misalignment problems.
The next button is Arduino. This opens a very powerful tool for direct target control and debugging. In a big text area it displays all the text received from the target, and the top buttons allow you to send commands to the target. Only use this tool under the supervision of a project expert.

And the last button is Target Settings. As opposed to the Local Settings, there parameters are not saved locally but in the target Arduino internal storage. So each time you open this window, the software asks the target for the current parameters and displays their value in this window.
When pressing the Apply setting to target button, the software sends all the parameters to the target to be applied immediately.

The parameters here are – on the Hardware tab:
- Target name: select a name for the target from a predefined list. This is useful if there are more than one target in the same location. It will also set the name of the Wi-Fi so that each target has it;s own Wi-Fi network.
- Motor: the type and timings for the witness paper motor. For a DC motor, only one parameter is needed – the time the motor runs and indirectly how much the paper is advanced. For a stepper motor, there are two parameters that do the same thing.
- LED Brightness: control of the brightness of the LED strip
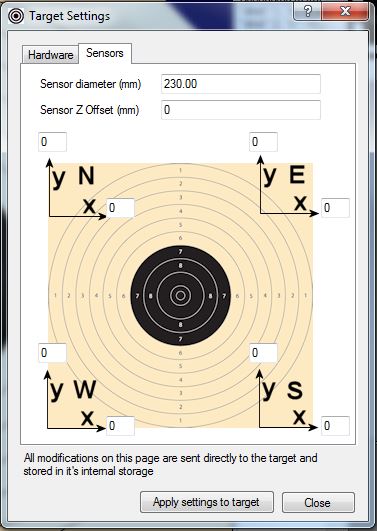
And on the Sensors tab:
- Sensor diameter: The physical distance between your sensors
- Sensor Z offset: the distance in your target housing between the paper target plane and the sensor plane
- Individual sensor displacement: if your target holder build was imperfect and one of the sensors is not exactly where it should be, you can adjust its position here.
All these settings in the Sensor tab are the primary way to fix accuracy problems of the target.
The last feature is the “Journal”. This is meant to be a database for all the saved sessions. When the Journal button is pressed, the software automatically disconnects from the target and the current session is saved.
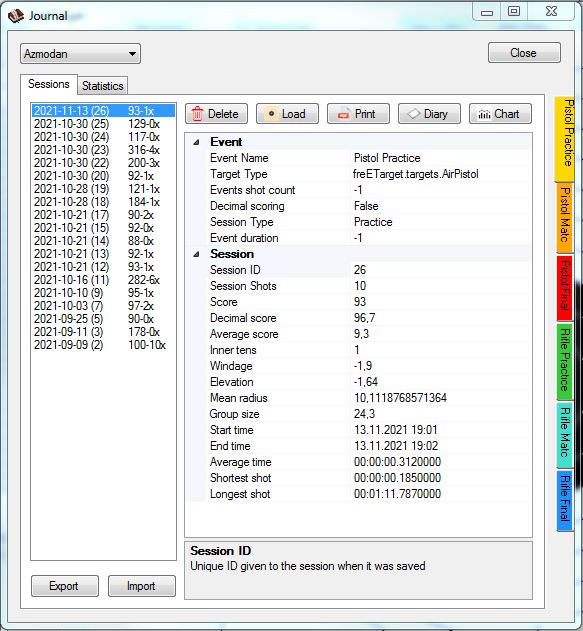
The Journal window has a dropdown combobox in the top left corner with the names of all the shooters in the database (all the shooters that shot at least one session).
Beneath it is the sessions list where all the saved sessions for the selected event are displayed. For each session, in the list is displayed the date when it was shot, its ID and its score. That should make identifying a session easy. Make sure you select the right event on the colored vertical tab event selector.
When clicking on a session, all it’s info is displayed on the right. The info is grouped in 2 groups: event information – that identifies the event of this session and session information – that shows this particular session data: ID, time, score, actual shots registered, etc
On top there are 5 buttons:
- Delete: deletes this session from the database
- Load: loads this session in the main window. The journal window will remain active, but you can focus on the main window and see where the shots of the session were registered, serie by serie.
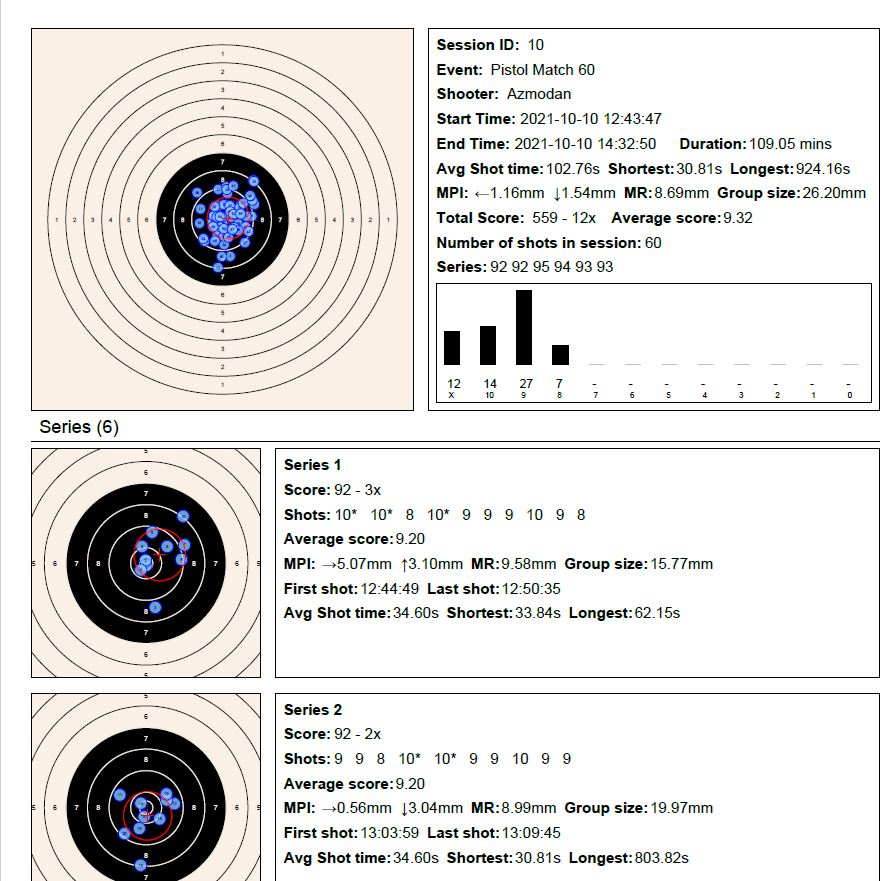
- Print: generates a PDF report for this session in the PDF save location and then runs the system PDF viewer to display it. The report contains all the data of the session, including a breakdown of all the series with all shots displayed
- Diary: you can record your thoughts and other external information about this session in an electronic shooting diary. Very useful for coaches.
- Chart: displays a chart with all the shots in the session: on the X axis is the time of the shot, on the Y axis the decimal score of the shot. This also can be useful to coaches.
Last element here is the statistics tab. Here are 4 charts aggregating all the sessions for the current event.
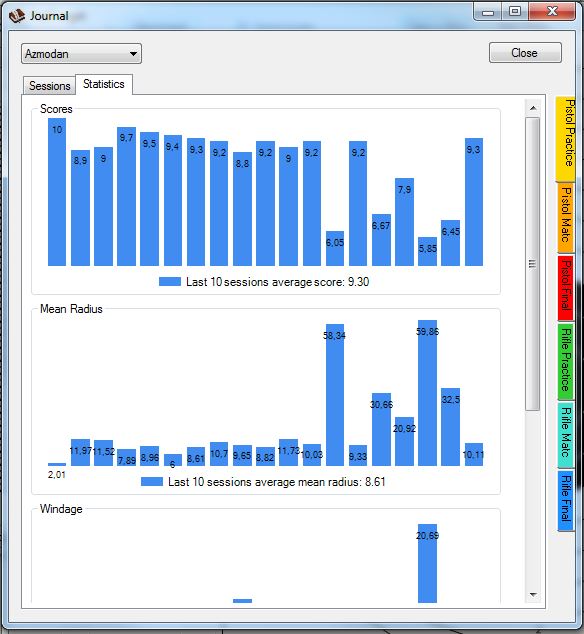
- First chart is the evolution of the scores
- Second chart is the evolution of the mean group sizes
- Third chart is the evolution of windage
- Fourth chart is the evolution of elevation. These last 2 are useful for calibrating the sights on your gun.
At the bottom there are 2 buttons: Import and Export. Export generates a text file in the MyDocuments\freETarget\sessionExport directory with all the information of the current session. The Import button loads such a file and creates a session in the database. These operations are useful if you want to move information between 2 computers or you want to backup your data.
Another purpose of this import/export feature is when upgrading the database. Version 3.x.x of the software uses version 3 of the database. If in the future, a version 4 will need to alter the database structure, and so the database version will be changed to 4. When you start the new version for the first time, the current old database with all your data will be deleted. In order to save your sessions, the software will give you a warning stating that the database is about to be overwritten. Do not press the button.
- Copy the Storage.db database file somewhere else.
- Press OK
- Uninstall the new software version
- Reinstall the old version
- Copy the Storage.db file back
- Run the old software and export your sessions
- Reinstall the new version
- Import the sessions
Of course, it would be easier to remember to export your sessions before installing a new version 🙂
These are all the features and the full functionality of the freETarget PC client software. For any bugs that you may encounter or any feature request, please feel free to contact me on facebook, in the freETarget group or on github. Please keep in mind that this is a free open source project, made in my spare time for fun.
Similar articles:
– freETarget build [EN]
– Electronic trainer: Trace
– Shooting glasses
– Romanian Gun Laws: who can own or conceal carry what types of guns [EN]
– Romanian gun laws [EN]
– PPC/WA1500: SR4″ match of 48 shots with a standard 4 inch revolver

Leave a comment